Bioimage tools containers
Prerequisites
Before starting this lesson, you should be familiar with:
Basic familiarity with command-line(e.g., cd, ls, mkdir, rm)
Basic knowledge of software installaion on Linux/macOS
Ability to read and edit text files using command-line editor (e.g., nano, vim)
Some experience with version control (e.g., Git))
Learning Objectives
After completing this lesson, learners should be able to:
By the end of this course, learners will will understand the fundamentals of containers, including installation, image management, container execution. They will also gain hands-on experience in building, running their own containers.
Motivation
Containers provide a lightweight, reproducible, and portable way to package and run applications across different environments. This module introduces Docker as a tool for simplifying software deployment. By learning container basics, users can streamline workflows, improve reproducibility, and easily share applications in research and development.
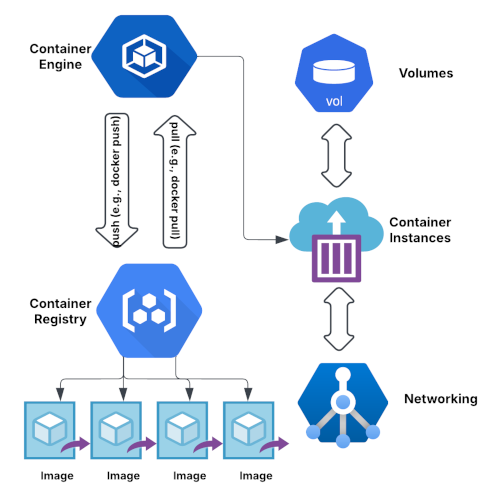
Concept map
Figure
Activities
Installation
This activity outlines the steps to install Docker on your computer, including
- Install Docker from APT repository (Ubuntu)
- Install Podman and XQuartz (maOS)
Show activity for:
Linux(Ubuntu)
You can install Docker Engine using different methods. This guide provides step-by-step instructions for installing Docker from Docker’s APT repository. For alternative installation methods, refer to the official Docker documentation
- Set up Docker’s APT repository
$ sudo apt-get update $ sudo apt-get install ca-certificates curl $ sudo install -m 0755 -d /etc/apt/keyrings $ sudo curl -fsSL https://download.docker.com/linux/ubuntu/gpg -o /etc/apt/keyrings/docker.asc $ sudo chmod a+r /etc/apt/keyrings/docker.asc- Add the repository to apt sources
$ echo "deb [arch=$(dpkg --print-architecture) signed-by=/etc/apt/keyrings/docker.asc] https://download.docker.com/linux/ubuntu $(. /etc/os-release && echo "$VERSION_CODENAME") stable" $ sudo tee /etc/apt/sources.list.d/docker.list > /dev/null $ sudo apt-get updateNote: If you use an Ubuntu derivative distribution, such as Linux Mint, you may need to use UBUNTU_CODENAME instead of VERSION_CODENAME.
- Install the latest Docker packages
$ sudo apt-get install docker-ce docker-ce-cli containerd.io docker-buildx-plugin docker-compose-plugin- Verify that the installation is successful by running the
hello-worldimage:$ sudo docker run hello-worldThis command downloads a test image and runs it in a container. When the container runs, it prints a confirmation message and exits.
macOS
Things to know
- The instructions have been tested on macOS Sequoia, it may or may not work for other OS version.
- To work with Docker on macOS, we recommend installing Podman Desktop.Podman Desktop provides a graphical interface for managing containers, offering an easy way to build, run, and control them. It is fully Docker-compatible and runs containers in a rootless, daemonless environment, enhancing security.
- Alternatively, you can use Docker Desktop but mindful of its license agreement.
- Since macOS lacks native X Window System,Version 11 (X11) support, which is required for running GUI applications inside containers, you will need to install XQuartz - an X11 server for macOS that enables GUI applications from containers to display properly.
Install Podman Desktop
- Download Podman Desktop from podman.io
- You can also install podman via
brewin terminal$ brew install podman- After installation, create and start your first Podman machine.
- Option 1: Follow the instructions on the prompt window to init and start your podman machine.
- Option 2: In a terminal, type
$ podman machine init $ podman machine start- Verify the installation information using:
$ podman info- Once the Podman machine is started, you should see its status as
Runningin the Podman Desktop GUI interface.- On the left-hand side of the Podman Desktop GUI, you can explore
Images,Containers,Volumes, andPodscurrently available on your host machine.Install XQuartz
- Option 1: Install via XQuartz official website
- Download XQuartz .pkg file from here
- Once downloaded the package, install it by double clicking the pkg file, and follow the instructions on-screen to complete the installation.
- Introduction:
Continue- Read Me:
Continue- License:
Continue- Installation Type:
Install
- Username: Enter your name
- Password: Enter your password
- Summary: Once installation was successful, click
Close- Reboot your Mac
- Option 2: Install via brew command
- Install Homebrew using the instruction from brew.sh
- Start a
Terminalon your Mac, and type the below command$ brew install --cask xquartz
- The flag
--caskis used to install GUI applications on macOS that are distributed as.dmg,.pkgor.appbundles.- You should see
xquartz was successfully installed!after installation finishes.- Reboot your Mac.
Docker basics
In this exercise, we will practice running Docker containers from existing images. This includes
- Pulling an image,
- Running a container from image (in both batch and GUI modes)
- Stopping containers
- Removing images.
Show activity for:
Run a simple container
First, we will run a simple
Hello-Worldcontainer, using existingubuntuimage from Dockerhub.For mac users using podman, simply replace
dockerwithpodmanin all the following commands.Steps
To run containers localy, we’ll first need to pull some images to local computer.
Start a terminal.On a fresh Docker(Podman) installation, we should have no images. To verify, we run
docker images(podman imagesfor mac users):$ docker images REPOSITORY TAG IMAGE ID CREATED SIZELet’s pull an image. By default, Docker and Podman retrieve images from Docker Hub. You can see all the containers available in Dockerhub by going to its website.
Go to https://hub.docker.com and search for
ubuntu. You should seeubuntuappear at the top of the results. Click on it, by default, you will be redirected to theOverviewpage. ClickTagsto see its available tags. Search22.10inFilter tagsbox.- To pull
ubuntu 22.10image from Docker Hub$ docker pull ubuntu:22.10- Once we pull the image, we can run a container from it.
$ docker run ubuntu:22.10 /bin/echo 'Hello world!' 3ad6ea492c35: Download complete 692eb4a905c0: Download complete Hello world!
- The
/bin/echocommand is a simple application that prints whatever input is provided to the terminal.When we passedHello world!, it printsHello world!to the terminal.- When you run the
docker runcommand, Docker/Podman creates a new container from the specified image and then runs the given command inside that container.- Note that when you run
docker run, Docker/Podman first checks if the specified image exists locally. If the image is not found, it automatically pulls it from Docker Hub(or another configured registry) before creating the container.- To check which containers are currently running after executing the previous command
$ docker ps CONTAINER ID IMAGE COMMAND CREATED STATUS PORTS NAMES
- No containers shown because the
docker pscommand only lists running containers by default.- To see all containers, including stopped ones, use the
-aflag.$ docker ps -a CONTAINER ID IMAGE COMMAND CREATED STATUS PORTS NAMES eb35afb7e7e0 ubuntu:22.10 "/bin/echo Hello wor…" 4 minutes ago Exited (0) 4 minutes ago pedantic_proskuriakova
- Our container shows the status Exited.
- Docker containers only run as long as the command it starts is running. Once the command completes or exits, the container stops automatically.
- In our example, the container ran
/bin/echosuccessfully, printed the output, and then exited with status code 0 (indicating no errors). Since Docker only run as long as their primary command is active, Docker stopped the container as soon as the command completed.- During development, if a container is stopped, we often need to inspect and debug what went wrong. To do this, we can run the container interactively with a shell session. To start a container interactively:
$ docker run -it ubuntu:22.10 /bin/bash root@cfb8305b8b00:/#
- The
-itenables Docker start a container in interactive mode.- This will you a interactive BASH session inside the Ubuntu container.
- By default, you are running as
rootuser inside the container.- You can now use this like a normal Linux shell. Try
pwdandlsto look at the file system.Exit the container by pressing
Ctrl+D, then we are on our host terminal again.- To remove this container, we use the
docker rmcommand.$ docker rm eb35afb7e7e0We have removed the container, but the image still exist on our computer. To free up space, it’s a good practice to remove unwanted images. The command
docker rmi <IMAGE ID>is used to remove unwanted images.
- Find the image ID using
docker imagesand remove the image with:$ docker rmi 692eb4a905c0 Deleted: 692eb4a905c074054e0a35d647671f0e32ed150d15b23fd7bc745cfb2fdeddbd Untagged: docker.io/library/ubuntu:22.10- Alternatively, we can delete images by tag instead of IMAGE ID. The following achieves the same result:
$ docker rmi ubuntu:22.10- If you see error about image is being used by container, add the
-fflag to thedocker rmi <IMAGE ID>command.- We can also remove all unused images, meaning images that are not referenced by any container, be careful before using
-a.$ docker image prune -a- Refer to Docker Docs for more options for the above command.
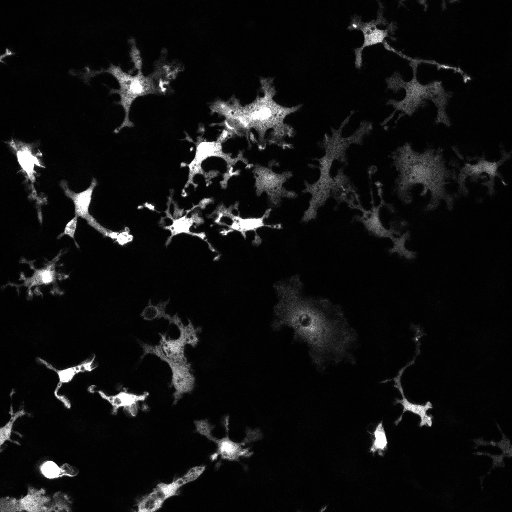
Run CellPose container
Now we will run a more complex container, CellPose, on your local computer. CellPose is a deep learning-based tool designed for robust and automated cell segmentation in microscopy images. This is the same CellPose container used on BARD.
For mac users using podman, simply replace
dockerwithpodmanin all the following commands.Steps
Pull the container image.
$ docker pull registry.git.embl.de/grp-cbbcs/abcdesktop-apps/cellpose3d Using default tag: latest c7322280ec71: Download complete 9266759a1867: Download complete ..... 1f5da5b9ba0c: Download complete registry.git.embl.de/grp-cbbcs/abcdesktop-apps/cellpose3d:latest- Verify the image exists.
$ docker images REPOSITORY TAG IMAGE ID CREATED SIZE ubuntu 22.10 692eb4a905c0 20 months ago 72.8MB registry.git.embl.de/grp-cbbcs/abcdesktop-apps/cellpose3d latest 1f5da5b9ba0c 7 days ago 12.8GB- Run CellPose locally in batch mode.
- Open a terminal and create a directory called
testimage,e.g.~/testimage$ mkdir ~/testimage- Download the example image from here and store it into
~/testimge$ cd ~/testimage $ wget https://raw.githubusercontent.com/embl-cba/bard-containers/refs/heads/main/cellpose-nobard/MAX_pg6-3CF1_20--t1-3.jpg- Perform segmentation on the example image using the
cytomodel$ docker run -v ~/testimage:/testimage 1f5da5b9ba0c --dir /testimage --pretrained_model cyto --save_png- Note the
-vflag which makes your test image on your local computer available inside container.- The
/testimageafter the colon is the target directory inside container. You example image will be available under this direcotry inside container.- The arguments after the container ID
1f5da5b9ba0care standard cellpose command options. You could refer to them here- After the run finished, your output images are saved in the same /testimage directory.
- Run CellPose locally in GUI mode.
- Linux (Ubuntu)
- Configure X11 to allow local processes (including Docker containers) to access the X server for running GUI applications.
$ xhost +localhostNow run the CellPose GUI container:
$ docker run -it --rm -e DISPLAY=$DISPLAY -v /tmp/.X11-unix:/tmp/.X11-unix 1f5da5b9ba0c
- Similar to the batch mode, to make data available inside the container, we use the
-vagain.$ docker run -it --rm -e DISPLAY=$DISPLAY -v /tmp/.X11-unix:/tmp/.X11-unix -v /home/ysun/testdata:/mnt/testdata 1f5da5b9ba0c
/home/ysun/testdatais the directory on you host computer./mnt/testdatais the target directory in your container. Docker will automatically creates it for you.- macOS
- Configure XQuartz
- Open XQuartz from your Mac.
- Go to Settings, on the Security tab, make sure “Allow connections from networkclients” is checked
- In XQuartz, open a terminal (XQuartz terminal) window and run the
xhost +command. You will see this text appear in your XQuartz terminalaccess control disabled, clients can connect from any host
- Run CellPose GUI.
- In Mac Terminal (not XQuartz terminal), Set the
DISPLAYenvironment variable to point to your Mac’s X11 server. This tells the container where to send the GUI output.$ export DISPLAY=host.docker.internal:0
- Verify the value is set correctly
  $ echo $DISPLAY
  host.docker.internal:0
- Start CellPose container with GUI
$ podman run -e DISPLAY=host.docker.internal:0 --rm 1f5da5b9ba0c
- The
-e DISPLAY=host.docker.internal:0tells the container where to send the GUI output.- The
--rmflag removes the container after exit.- If
host.docker.internal:0doesn’t work, try:export DISPLAY=$(ipconfig getifaddr en0):0
Build your own container
- The previous activities focus on running Docker containers from images, it’s useful to understand how these images are created.
- Sometimes, existing Docker images may not meet your specific needs, they might lack necessary dependencies or require custom configurations.
- A Dockerfile allows you to create a tailored image by defining exactly what’s inside the container. While we won’t dive deep into writing Dockerfiles, but we’ll briefly touch on why they matter. Having this context will help you better understand the images you’ll be working with.
- We will perform the following tasks in this activity:
- Understand the Dockerfile
- Build from the Dockerfile
Show activity for:
Understand Dockerfile
- Open the Dockerfile
- The first 2 lines starts from a base image. The keyword
FROMtells Docker Engine where to look for the base image, and it must be the first instruction in a Dockerfile.ARG TAG=3.2
FROM abcdesktopio/oc.template.ubuntu.22.04:$TAG
- For Mac users using Podman, you will need to use the full URL, i.e. append
docker.ioat the begining.FROM docker.io/abcdesktopio/oc.template.ubuntu.22.04:$TAG
- The
RUNstatements in the Dockerfile executes commands inside the container at build time. It often used for installing dependencies.For example, the below statement updates the package list and installscurl.RUN apt update -y && apt install -y curl
- The
ENVsets environemnt variables inside the container. These variables persist at runtime. For example, the below statement sets the NVIDIA GPU capabilities inside the container.ENV NVIDIA_DRIVER_CAPABILITIES “compute,utility”
- The
WORKDIRsets the working directory inside the container. All subsequent commands run from this directory.WORKDIR /tmp
- The
CMDspecifies the default command to run when container starts. It executes at runtime. For example, the below statement runs the script inside the container to start the cellpose module.CMD [“/composer/appli-docker-entrypoint.sh” ]
- The
USERsets the user under which the container runs. By default, if noUSERis specified in Dockerfile, the container runs asroot. Note that running asrootis risky, but sometimes required.- The statements in Dockerfile are translated from the instructions for installing CellPose.
- Finally, we have a recipe for CellPose.
Build from Dockerfile
Once we created the Dockerfile, we can build the container image locally. For mac users, replace
dockerwithpodman.
- Download everything from here.
- You will need all files to run it locally.
cellpose.svgandcp3d.jsonare specific for the BARD, we could safely ignore them for now.- Go to the same directory where your Dockerfile is located, start a terminal and enter the commands below.
$ docker build -t cellpose:01 .
- The
-tflag specifies the image tag, allowing you to name and version the built image.- The command must run in the same directory where Dockerfile is located. The . at the end of the command is important as it tells Docker to use the current directory as the build context.
- If Dockerfile is located at a different directory, use the
-fflag to specify its path.By default, the Docker recipe is named Dockerfile, but you can name it differently and specify the custom name when building the image using the
-fflag.$ docker build -t cellpose:01 -f /home/ballonn/cellpose_recipe.dwhere
/home/ballonn/cellpose_recipe.dis the path to the Docker recipe.- For Linux users, you may see a
WARNINGafter the build is finished.WARNING: No output specified with docker-container driver. Build result will only remain in the build cache. To push result image into registry use –push or to load image into docker use –load
This is caused by BuildKit. For newer Docker version, BuildKit is enabled by default. The build result is stored only in the cache, meaning it won’t be available as a usable image unless explicitly saved.
Now we load the image from cache to local machine:
$ docker buildx build --load -t cellpose:01 .Verify the image exists locally.
$ docker images REPOSITORY TAG IMAGE ID CREATED SIZE moby/buildkit buildx-stable-1 f210b5f94e18 13 days ago 209MB cellpose 01 9055a7c1a1ef 51 minutes ago 12.7 GB- Now we have the cellpose container locally, we can run it by using the steps in previous activity
Run CellPose containerfrom step 3.
Follow-up material
Recommended follow-up modules:
Learn more: